- For guidance on using the plugin within Canvas, please see our Canvas LTI 1.3 Overview article. Or, for general information and FAQs about LTI integration, please see this article.
- This connector is separate from the legacy LTI 1.1 connector, and can operate simultaneously with LTI 1.1.
- This integration supports two registration methods - Automatic JSON Registration surfaces all of your Infobase Platform products into a single tool, and Manual Registration allows the choice of all products or a specific product individually.
Jump to:
Automatic JSON Registration
Manual Registration
Automatic JSON Registration
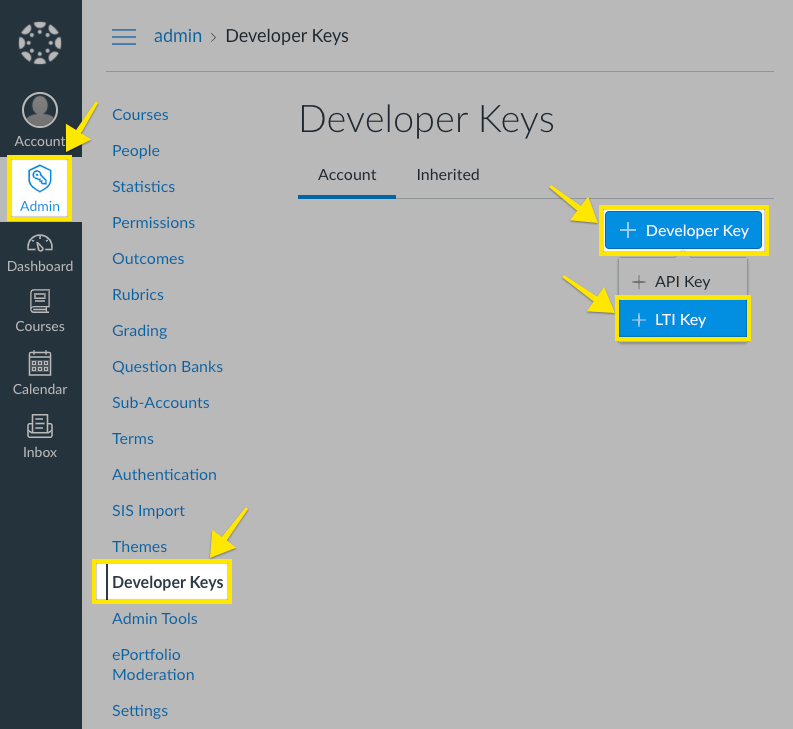
Add a developer key in Canvas:
- Login to your Canvas LMS as an administrator.
- Navigate to 'Admin' -> [your account name] -> 'Developer Keys'
-
Click the '+ Developer Key' button followed by the '+ LTI Key' dropdown
- In the resulting form, enter the following information:
- Key name:
Infobase Platform - Method:
Enter URL - Redirection URI(s):
https://lti.infobase.com/ - JSON URL:
https://lti.infobase.com/register/canvas
- Key name:
-
Click the 'Save' button.
- After saving, find the newly registered tool's key on the list of keys and make sure the State is switched to 'ON'
- Note the number in the details column. It will be used as the
Client IDin the next steps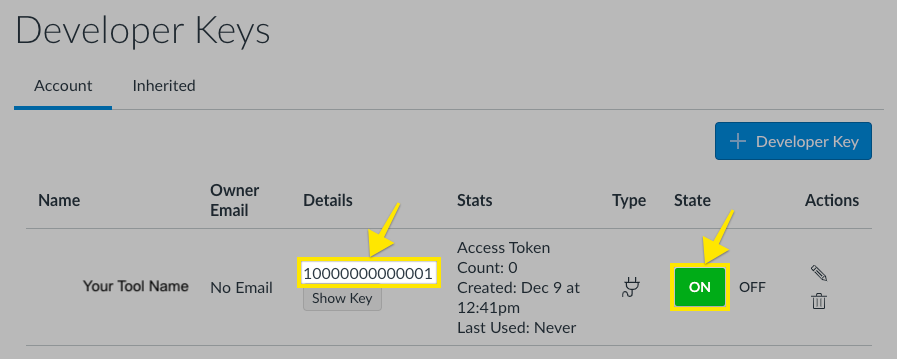
- Add the Icon URL -
-
Edit the developer key and add the following Icon URL:
https://assets.infobase.com/icons/infobase.svg
-
Edit the developer key and add the following Icon URL:
- OPTIONAL: To add any additional placements -
- Edit the developer key
- Within the Placements section, select your desired placements
-
Set the message type as “LtiDeepLinkingRequest”
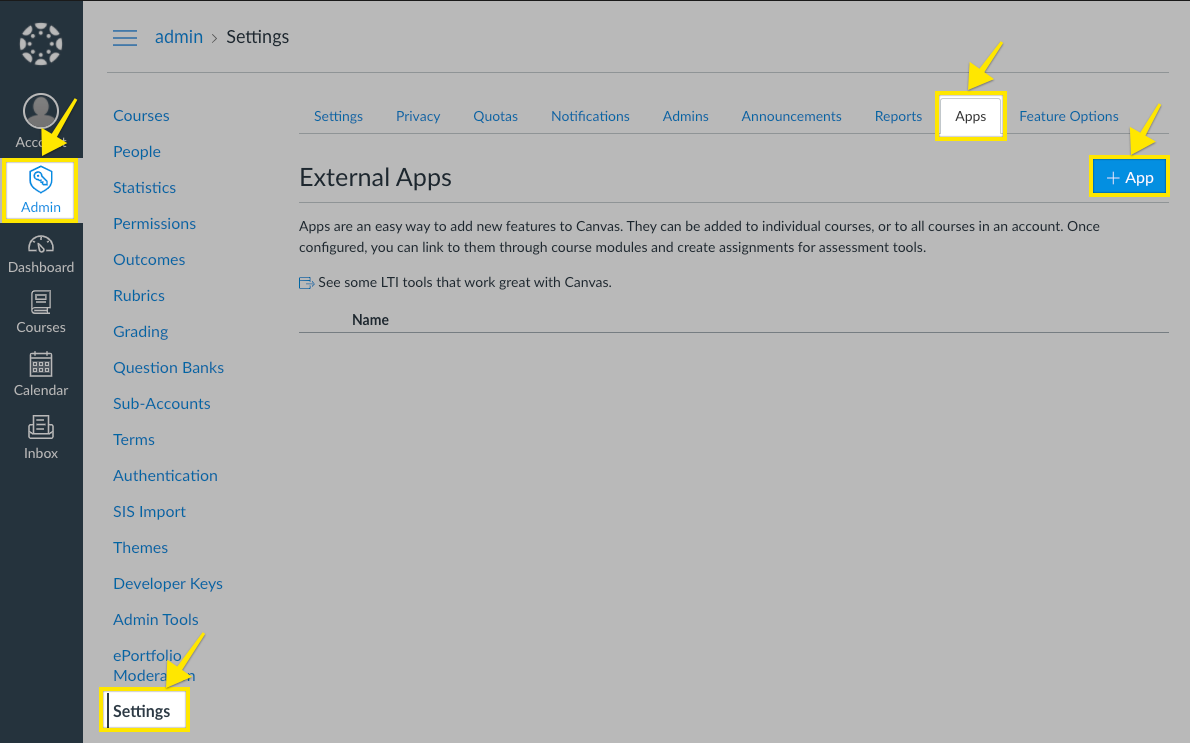
Install the tool into Canvas:
- In the Canvas Admin menu, navigate to 'Settings' -> 'Apps'
-
Click the '+ App' button
- In the resulting form choose:
- Configuration Type:
By Client ID - Client ID:
[The Client ID number you found in the previous series of steps]
- Configuration Type:
-
Click the 'Submit' button
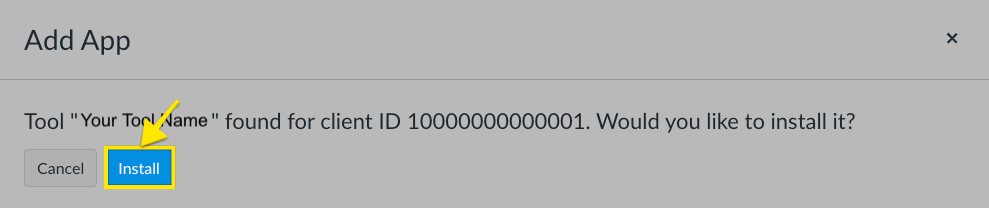
-
In the resulting dialog, click 'Install'
- The tool will now show up in the 'External Apps' table.
- Email your Client ID and the domain (URL) of your LMS to productsupport@infobase.com who will complete the connection. Please mention that you used the automatic JSON registration process, as well as the type of Canvas instance (cloud-hosted, cloud-test, or self-hosted).
- Once support confirms that the connection has been finalized, navigate to a Page within a Course. Find the list of external tools in the toolbar, and click on "Infobase Platform" to launch it. You should see the app open in an iframe.
Manual Registration
Add a developer key in Canvas:
- Login to your Canvas LMS as an administrator.
- Navigate to 'Admin' -> [your account name] -> 'Developer Keys'
-
Click the '+ Developer Key' button followed by the '+ LTI Key' dropdown
- In the resulting form, enter the following information:
- Key name:
Infobase Platform - Method:
Manual Entry - Redirection URI(s):
https://lti.infobase.com/ - Title:
Infobase Platform - Description:
Infobase’s new, integrated platform provides a streamlined and intuitive experience for accessing your digital collections. This platform focuses on improving usability and content delivery, making it easier for all of your users to navigate, search, and engage with high quality learning materials. -
Target Link URI: Choose the URL that matches how you want the tool to appear -
-
All products - use this URL to display all of your available Infobase Platform products together within a single tool:
https://lti.infobase.com/ -
Single product - use the URL for the specific product you want to display. See the list below for product URLs. If you would like multiple individual product tools, perform the complete registration steps for the first product, then repeat all steps for others.
- Access Video On Demand:
https://lti.infobase.com/?tool=avod - Bloom's Literature:
https://lti.infobase.com/?tool=blooms - Classroom Video On Demand:
https://lti.infobase.com/?tool=cvod - Credo Reference:
https://lti.infobase.com/?tool=credo - Credo Source:
https://lti.infobase.com/?tool=credosource - Films On Demand:
https://lti.infobase.com/?tool=fod - History Center:
https://lti.infobase.com/?tool=history - Health Reference Center:
https://lti.infobase.com/?tool=health - Issues & Controversies:
https://lti.infobase.com/?tool=issues - Polling the Nations:
https://lti.infobase.com/?tool=polling -
Science Center:
https://lti.infobase.com/?tool=science
- Access Video On Demand:
-
All products - use this URL to display all of your available Infobase Platform products together within a single tool:
- OpenID Connect Initiation Url:
https://lti.infobase.com/login - JWK Method:
Public JWK URL -
Public JWK URL:
https://lti.infobase.com/keys
- Key name:
- Further down in the form, select the permissions/services you would like to allow. For clarification, our Infobase Platform LTI 1.3 tool does not require any of these to be enabled.
-
Toward the bottom of the form, add placements for your tool. These are the locations in the LMS where your tool can be accessed.
Editor Button is the most common placement, which will add the tool to your list of plugins wherever the html editor is displayed. To determine the best placements for your institution, placement examples can be found in Instructure's Developer Portal here: https://developerdocs.instructure.com/services/canvas/external-tools/lti/placements/file.placements_overview
If you are using Deep Linking, select
LtiDeepLinkingRequest. Otherwise, selectLtiResourceLinkRequestfor a basic LTI launch.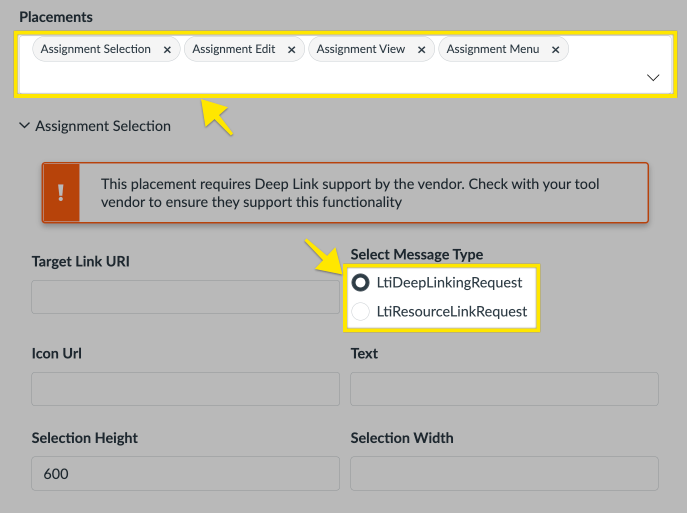
-
Click the 'Save' button at the bottom when the form is filled.

- After saving, find the newly registered tool's key on the list of keys and make sure the State is switched to 'ON'.
-
Note the number in the details column. It will be used as the
Client IDin the next steps.
Install the tool into Canvas:
- In the Canvas Admin menu, navigate to 'Settings' -> 'Apps'
-
Click the '+ App' button
- In the resulting form choose:
- Configuration Type:
By Client ID - Client ID:
[The Client ID number you found in the previous series of steps]
- Configuration Type:
-
Click the 'Submit' button
-
In the resulting dialog, click 'Install'
- The tool will now show up in the 'External Apps' table.
- Email your Client ID and the domain (URL) of your LMS to productsupport@infobase.com who will complete the connection. Please mention that you used the manual registration process, as well as the type of Canvas instance (cloud-hosted, cloud-test, or self-hosted).
- Once support confirms that the connection has been finalized, navigate to a Page within a Course. Find the list of external tools in the toolbar, and click on "Infobase Platform" to launch it. You should see the app open in an iframe.